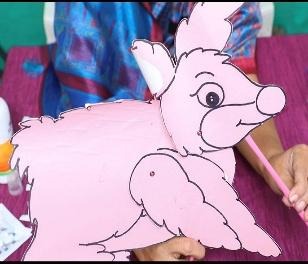
Rabbit
 Objective
To help teachers create a puppet of a rabbit for story-telling and other purposes.
Estimated time to create the Stick Puppet – Rabbit
1 to 1.5 Hours
Materials required for creating the Stick Puppet – Rabbit
- Chart paper (preferably thick for durability)
- Colour paper (light pink or white for the rabbit’s body)
- Scissors
- Glue or adhesive
- Split pins (brads)
- Sketch pens or markers
- Paper straws
- Pencil
- Punching machine or safety pin (for making holes at joints)
Preparation for activity
- Ensure all materials are ready and within reach.
- Pre-draw or print parts of the rabbit: body, two front legs, head and ears separately.
- Make sure parts are proportional for proper joint movement.
- Outline features on coloured paper for neatness.
- Prepare sticks for control handles.
Procedure
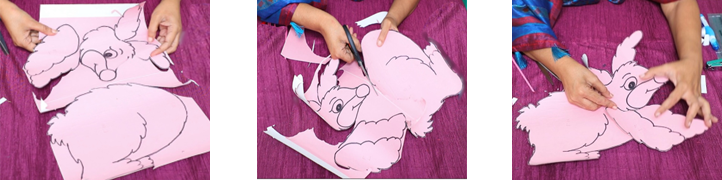
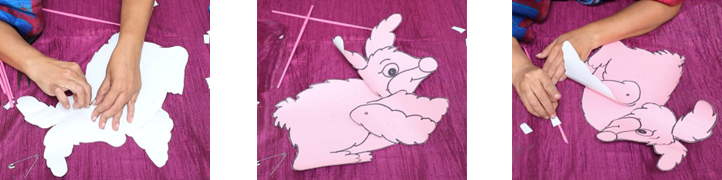
- Step 1:
- Draw and cut the parts
- Sketch the rabbit body, front legs and head on a chart paper.
- Cut each piece neatly.
- Step 2:
- Paste coloured paper
- Stick coloured paper over the parts (if required), then trim the edges to match the shape.
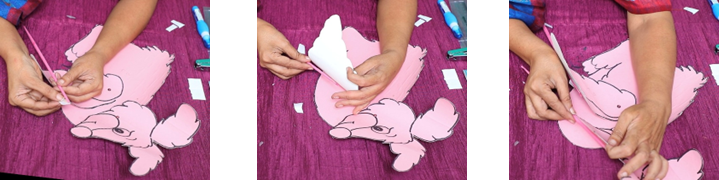
- Step 3:
- Add details
- Draw eyes, nose, mouth and outline ears using a black marker.
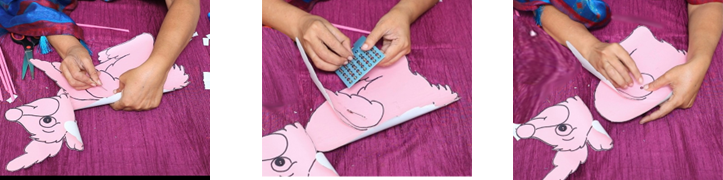
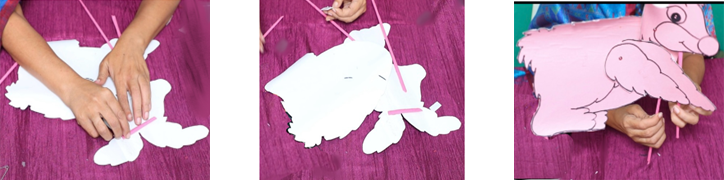
- Step 4:
- Create movable joints
- Punch holes at the base of the head and front legs.
- Use split pins to attach the head and front legs to the body.
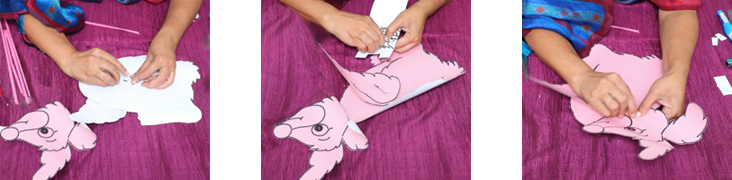
- Step 5:
- Attach the sticks
- Stick paper straws or ice cream sticks behind the moving parts (legs and head) to control the action of the puppet.
- Attach one stick to the main body for holding.
- Test the movement by holding the main stick and moving the others to simulate head and limb motion.
Step by Step Pictures to create the puppet
Important Tips
- Use contrasting outlines to highlight features.
- Ensure split pins are not too tight, so that the parts move freely.
- Use thick chart paper for durability.
- Let the glue dry completely before using the sticks.
Precautions
- When fixing the split pins, avoid pressing too hard to prevent tearing.
- Keep small parts like pins and sharp tools out of reach of children.
- The split pins can be covered with cello tape for safety.
Troubleshooting:
- If the joints are not moving freely, loosen the split pin or slightly widen the punched hole.
- If the paper is tearing at the joints, reinforce with tape or a second layer of paper before attaching the pins.
- If the sticks are not held firmly, use a glue gun or strong adhesive tape to fix them.
 Notes to the Teacher
- Using puppets also aids in developing motor skills, such as hand-eye coordination. Additionally, puppets can enhance communication and social skills, improve focus and concentration and help teach concepts and values.
- Use this puppet to narrate stories or teach about animals and their movements.
- Encourage children to personalise their puppet with colours or names.
Using the Learning Teaching Material:
The teacher can conduct a ‘Puppet Show’. Teachers can encourage the children to create these puppets and have a ‘Puppet Show’ in the classroom.
Video: How to use Learning Teaching Material
| Source and Attribution of images All images used in the above Assets and Aids are originally created. |
| This digital material has been developed by the Sri Sathya Sai Vidya Vahini Inclusive Education Project, a unit of Sri Sathya Sai Central Trust, Prasanthi Nilayam, as a collaborative offering in the service of our nation. |