Girl
 Objective
To help teachers create a puppet of a girl for story-telling and other purposes.
Estimated time to create the Stick Puppet of a girl
1 to 1.5 Hours
Materials required for creating the Stick Puppet of a girl
- Chart paper (for the puppet base)
- Scissors
- Glue or adhesive
- Split pins (brads)
- Sketch pens or markers (for facial features and outlines)
- Bamboo sticks / paper straws (for puppet control)
- Pencil & eraser (for drawing)
- Hole punch or sharp tool (to make holes for joints)
Preparation for activity
- Gather all the materials in advance.
- Pre-draw the body parts of the girl (head, torso, legs, and arms if needed separately).
- Cut the parts neatly for a smooth look.
- Decide the joint positions (neck, legs, or arms) where movement will be enabled.
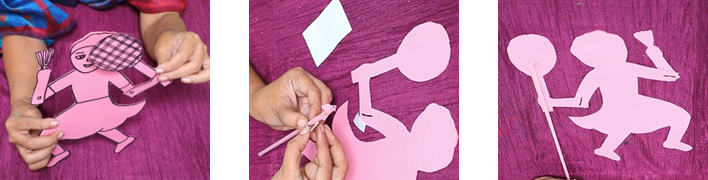
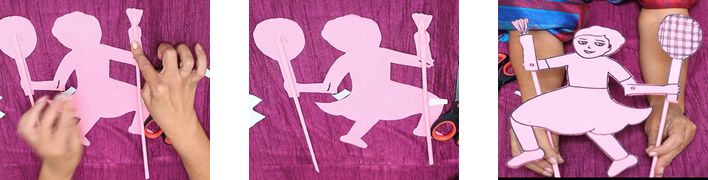
Procedure
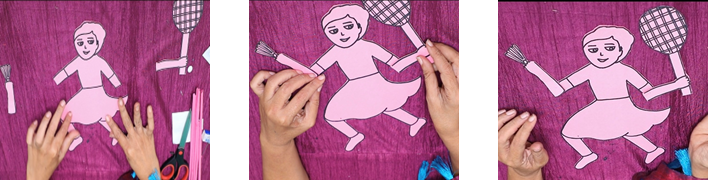
- Step 1:
- Draw and cut shapes
- Draw the outline of the girl on chart paper.
- Cut out the head, torso, and legs (if movable). Trim neatly to shape.
- Step 2:
- Add details
- Draw eyes, mouth, hair, and dress details using markers.
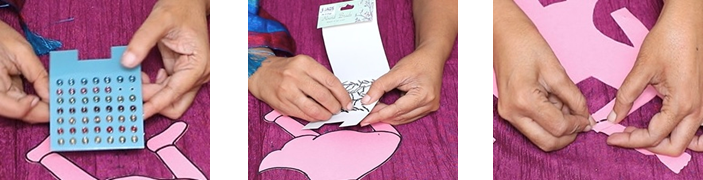
- Step 3:
- Make joints
- The demonstration video shows the puppet moving only the forearms. It can be modified for moving the head and legs as well.
- Accordingly, punch holes at the required joints (e.g. base of the head, near the hips for the legs, at the elbows for the lower part of the arms).
- Fix the head, legs and arms to the body using split pins, allowing free movement.
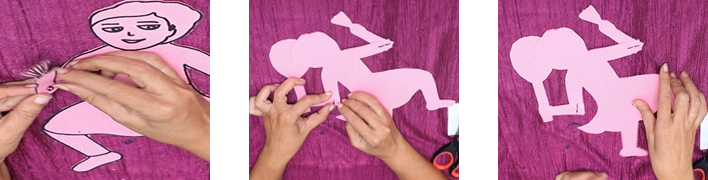
- Step 4:
- Attach sticks
- Fix a paper straw/stick to the back of the head, each movable leg and arms.
- Fix one longer stick to the torso to hold the puppet upright.
- Step 5:
- Final assembly
- Test movement by holding the torso stick and moving the legs, head and arms with side sticks.
Step by Step Pictures to create the puppet
Important Tips
- Use bold outlines to make the puppet visually clear.
- Ensure split pins are not too tight, so that parts can move smoothly.
- Balance the stick placement to make puppet control easier.
- Add colour contrast (dress, shoes, hair) to make it attractive for children.
Precautions
- Avoid using excess glue which may weaken the structure.
- Reinforce delicate areas (like joints) with tape to prevent tearing.
Troubleshooting:
- If the joints are too stiff, loosen the split pins slightly.
- If the paper is tearing at the holes, reinforce with transparent tape or an extra paper layer before pinning.
- If the sticks are not fixed properly, use stronger adhesive or secure with tape.
- If the puppet is bending or not stable, use thicker chart paper or double-layer for strength.
 Notes to the Teacher
- This puppet can be used in storytelling, role play, or action-based lessons.
- It helps children understand body movements and coordination.
- Encourage children to design their own characters (boy, girl, animals, etc.).
- It can be linked with topics such as daily activities, sports or festivals.
- Engage the class by letting children operate the puppet in small skits.
Using the Learning Teaching Material:
The teacher can conduct a ‘Puppet Show’. Teachers can encourage the children to create these puppets and have a ‘Puppet Show’ in the classroom.
Video: How to use Learning Teaching Material
| Source and Attribution of images All images used in the above Assets and Aids are originally created. |
| This digital material has been developed by the Sri Sathya Sai Vidya Vahini Inclusive Education Project, a unit of Sri Sathya Sai Central Trust, Prasanthi Nilayam, as a collaborative offering in the service of our nation. |