I CAN BRUSH MY TEETH
ADL
Objective

Child will be able to relate to the steps of brushing teeth.
Estimated time to create the LTM
2 to 3 Hours
Materials required for activity
- Thick craft sheet A4 size – Black – 7 – 8 nos.
- Toothpaste tubes – 2 nos
- Toothbrushes – 5 nos
- Small plastic mug shaped toy or any other bathroom related toy/object
- Paper cup – 1 no.
- Air dry clay for making the teeth and lip model
- A piece of hand towel
- Craft tool for scraping the clay
- Tooth pick for finer detailing and smoothening
- Scripts for each page – in bold and big font printed and cut into suitable strips.
- Any Red colour paint
- Glue dots or hot glue
- Scissors
- Ring binder
Preparation of Activity
Keep the material ready and if you are using hot glue, ensure that the hot glue is heated appropriately and ready for use.
Procedure
- Spread the A4 sheet on a flat surface.
- Place the objects for each page on the sheet and by eye judgement arrange them to be in the middle section of the sheet. For objects to be used in each page please refer to the images given under -Using the TLM.
- Using a pencil, mark the positions for each object, on the paper.
- Take one object at a time. Apply hot glue or glue dots at its pre-marked position and immediately place the object over it and press gently. Wait for the glue to dry completely and ensure that the object is stuck firmly to the sheet.
- Then proceed with the rest of the objects in the sheet.
- Repeat the procedure for all the sheets.
- Punch holes on the sheet to insert the binding clips.
- Attach the sheets to the ring in sequential order to get the Tactile textbook ready.
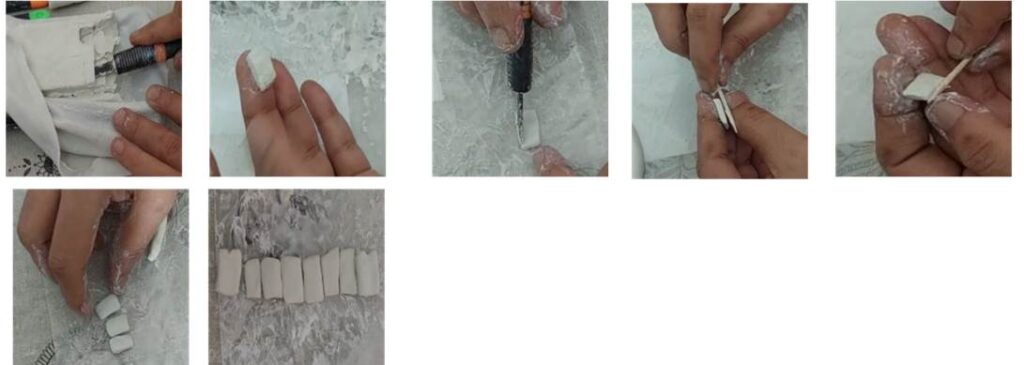
Pictures for reference to make tooth models
Using the air dry clay scrap required length from the clay bar and smoothen it to make the lip part.

Scrap small pieces from the bar, shape it to a rough rectangle and smoothen the edges to make the teeth.

Take a bigger piece for the Molar teeth and using a tooth pick press and mark the impressions and smoothen the edges.

Make a shallow holes on one side of the clay strip that was already prepared for the lip. Insert the teeth one by one into the holes, press and bind the joints using we fingers. Pain the lip portion using Red color.

Important Tips
- In Page-2 a small plastic mug shaped toy or any other bathroom related toy/object, that the child is familiar with, can be used.
- While attaching the properties on the sheet, it may be ensured that enough space is provided between them, so that the child can conveniently access and get a feel of each of them.
- In Page – 6, a paper cup can be cut into half vertically, using a scissor and pasted on the sheet
Precautions
Please do not touch the glue when it is hot in the glue gun and scissor and cutter to be used carefully.
Troubleshooting:
If materials are not available, we can apply glue on the chart paper and stick sand on it.
 Notes to the Teacher
- You can personalise this with the child’s picture.
- You can use cardboard instead of chart paper.
- You can make a visual schedule to show the steps.
Using the LTM
Follow the steps shown below and use the LTM to demonstrate Brushing the teeth. Let the children also use the LTM to reinforce learning.

How to use the LTM: Click here
| Source and Attribution of images All images used in the above Assets and Aids are originally created. |
| This digital material has been developed by the Sri Sathya Sai Vidya Vahini Inclusive Education Project, a unit of Sri Sathya Sai Central Trust, Prasanthi Nilayam, as a collaborative offering in the service of our nation. |