Girl Puppet Using a Ball
 Objective
To guide teachers for creating a Girl puppet using a ball to be used as a Learning Teaching Material.
Estimated time to create the Girl Puppet using a Ball
1 to 1.5 hours
Materials required for creating the Girl Puppet using Ball
- Small thermocol or plastic ball (for the head)
- Old cloth, paper cup or socks (for the body)
- Wool or yarn (for hair)
- Googly eyes or buttons (for eyes) or can be drawn with a marker
- Fevicol or glue gun
- Coloured paper and fabric scraps (for dress)
- Sketch pens or markers
- Rolled chart paper cylinder (for puppet handle)
- Scissors and tape
- Optional: beads, lace and small decorative items
Preparation for activity
• Ensure all materials are gathered and organised before beginning.
• If working with young children, pre-cut the fabric and paper pieces to avoid accidents.
• Keep reference pictures of puppets for inspiration.
Procedure
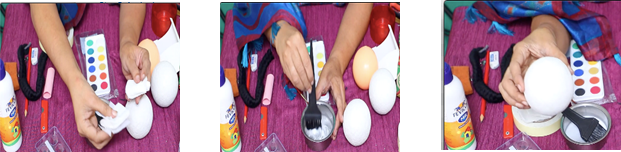
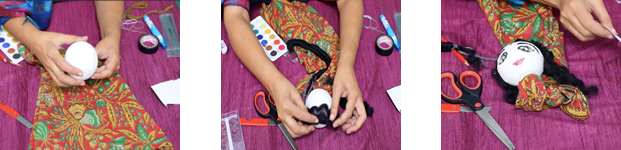
- Take the thermocol or plastic ball and fix it securely with a finger pipe to hold the puppet. The ball becomes the puppet’s head.
- For this, mix fevicol with water in a bowl using a brush.
- Cut the tissue paper into small squares. Apply the fevicol mixture to the ball and stick the tissue paper squares all over the ball, slightly overlapping each other to cover the entire ball. Let it dry for 15 minutes. The ball will look fully covered with paper.
- Make the puppet’s neck by rolling a piece of chart paper around your index finger to form a pipe of about 4 inches long and glue the edges.
- Next place the pipe and the ball and trace its outline with a pencil. Carefully cut along the outline using a pen knife.
- Apply glue around the half way mark of the pipe and insert it into the hole. You can reinforce it by applying more fevicol around the rim. Let it dry completely.
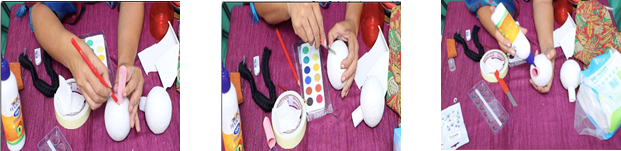
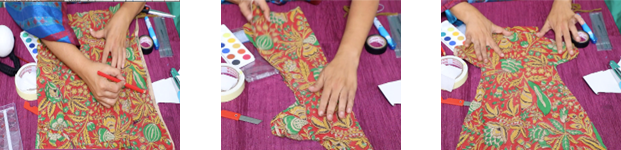
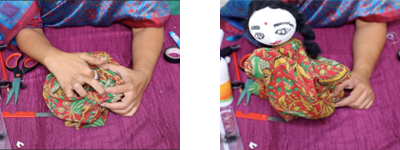
- Now for the dress, take a rectangular piece of cloth, fold it in two layers. Draw a simple shape including the neckline and sleeves. Now cut it along the drawing. Folding the cloth lengthwise, ensures symmetry.
- Sew along the edges, using a sewing machine or a running stitch leaving the bottom and the neck open. Fold and stitch the neckline to create a drawstring casing. Then invert the dress inside out. To attach the head, insert the paper pipe into the dress’s neckline and pull the drawstring tight to secure it.
- For the hair, I have used creepers which are available in the market. Paste them on the head using fevicol.
- For the face, use water colours to paint the eyebrows, the eyes and the lips. You can either draw the nose or cut a small triangular piece of paper, snip the top slightly, fold the sides, apply glue to the folded parts and affix it to the face like this.
- To use the puppet, insert your index finger into the finger pipe. Use your thumb and middle finger for the arms. Your puppet is now ready.
Step by Step Pictures to create the puppet

Important Tips
- Use lightweight materials to make the puppet easy to handle for children.
- Prepare a sample puppet beforehand as a visual reference.
- Encourage children to customize their puppets with unique features like hairstyles, colours, or accessories.
- Label and organise materials before starting the activity to save time.
- Allow enough drying time between steps for a neat finish.
- Reinforce the puppet’s neck and handle well to prevent it from loosening during play.
Precautions
- Supervise students closely when using scissors, glue guns or pen knives.
- Avoid very small decorative items (like beads) for younger children to prevent choking hazards.
- Use non-toxic paints, glues, and materials.
- Ensure that the workspace is covered with newspaper or cloth to prevent a mess.
- If working with thermocol, handle gently to prevent it from cracking.
Troubleshooting:
- Head not staying fixed: Apply extra glue around the pipe joint and let it dry longer.
- Dress not fitting properly: Recheck the neckline size before stitching; use a drawstring to adjust.
- Face features smudging: Let paint dry completely before touching or adding hair.
- Puppet too heavy: Replace fabric with lighter material like paper or cotton cloth.
- Pipe slipping from head: Wrap tape around the pipe’s end before inserting it into the ball for better grip.
 Notes to the Teacher
- Demonstrate each step slowly and clearly before letting students proceed.
- Divide students into small groups and assign roles (cutting, gluing, decorating).
- Encourage creativity – no two puppets should look the same!
- Discuss sustainability by using recycled or reusable materials.
- Display finished puppets on a classroom puppet board or corner for appreciation.
- Integrate reflective discussion afterward – ask students how they felt creating their puppet.
Different ways of using the puppet in class:
- Storytelling: Use puppets to narrate moral stories, fables or folk tales.
- Language learning: Puppets can ‘speak’ in English or regional languages to teach dialogues or pronunciation.
- Value education: Use puppets to demonstrate empathy, respect and teamwork.
- Science and social studies: Puppets can act as ‘characters’ explaining concepts or representing historical figures.
- Assessment tool: Students can use puppets to retell lessons or concepts creatively.
- Emotional expression: Encourage shy or anxious students to use puppets to express their feelings.
Using the Learning Teaching Material
The teacher can conduct a ‘Puppet Show’. Teachers can encourage the students to create these puppets and have a ‘Puppet Show’ in the classroom.
Video: How to use Learning Teaching Material
| Source and Attribution of images All images used in the above Assets and Aids are originally created. |
| This digital material has been developed by the Sri Sathya Sai Vidya Vahini Inclusive Education Project, a unit of Sri Sathya Sai Central Trust, Prasanthi Nilayam, as a collaborative offering in the service of our nation. |