Face of Man
 Objective
To guide teachers in creating a puppet of a man’s face for story-telling and other purposes.
Estimated time to create the Face of Man
30 to 45 Minutes
Materials required for creating Face of Man
- Thick chart paper- Yellow colour- for the Face, Nose, Ears and paper pipe
- White chart paper – small pieces for eyes and lips
- Stapler with pin
- Pencil
- Fevicol
- Scissors
- Black and Red Marker Pens
Preparation for activity
Keep the materials ready. If you are using hot glue instead of Fevicol, ensure that the hot glue is heated suitably and is ready for use.
Procedure
- This face puppet is relatively bigger in size.
- Face: Take a wide strip of thick yellow chart paper. Roll it to form a hollow cylinder, overlapping the shorter edges of the strip.
- Ensure the overlap is smaller at the top and gradually becomes wider at the bottom – this gives the jaw a broader shape than the forehead. Holding the overlap in place, staple the top and bottom edges securely. Now the hollow face is ready.
- Nose: Using a small piece of yellow chart paper, cut out a triangle proportionate to the size of the face. Fold this triangle and crease it in the middle. Then, slightly fold the left and right edges backward. Trim the excess projections, if needed. Apply fevicol on the folded edges and fix the nose firmly in the centre of the face.
- Eyes: Fold a small piece of white sheet in half. Draw the shape of an eye on one side using a pencil and cut along the outline with scissors to get a symmetrical pair of eyes.
- Draw the outline of the eyes and the eyeballs using the black marker pen.
- Reverse the pieces, apply fevicol on the back side and stick them onto the face, spacing them evenly on either side the nose.
- Ears: Take a piece of yellow chart paper, fold it in half and draw the shape of one ear. Cut along the outline to get a pair of ears. Slightly fold the inner edges, apply fevicol and fix them on either side of the face, maintaining equal distance from the eyes.
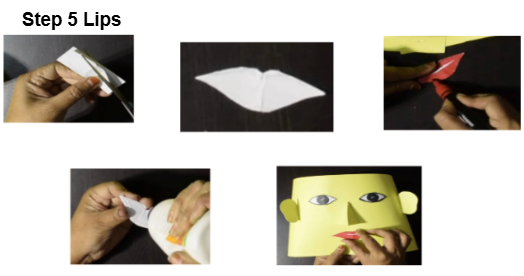
- Lips: On a piece of white paper, draw and cut out the shape of lips. Colour the lips, using the red marker pen, apply fevicol on the reverse side and stick it on the face just below the nose.
- Hair: Take a wide strip of black chart paper, long enough to go around the forehead.
- Make thin vertical cuts along its length – cut only up to ¾ of the paper’s width. Take care not to cut too close to the edge. Apply fevicol along the uncut edge of the strip and stick it around the head. The hair is now ready.
- To smoothen the jawline and sides of the face, trim and remove excess paper as needed.
- Paper pipe: Take a strip of yellow chart paper, roll it to fit the size of your hand and stick the edges to form a tube or pipe.
- Place the tube inside the hollow face, behind the nose and lips. Fix it using fevicol.
- Draw the eyebrows above the eyes using the black marker pen.
- Allow a few minutes for everything to dry. Your puppet is now ready to be used as a ‘Boy’.
- To convert it to a ‘Man’, draw a moustache below the nose using the black marker pen.
- Insert your hand into the paper pipe and move the puppet’s head to act like a boy or man.
Step by Step Pictures to create the puppets


Important Tips
- Instead of using black coloured paper for the hair, a ‘creeper’ (artificial hair used in drama makeup) can be attached for a more realistic look.
- Wedding cards or book covers can be good alternatives to drawing sheets.
- Reference images from drawing books or the internet can be helpful while designing the puppet.
- While creating the puppet, try to replicate the character illustration from the children’s textbook. Once the puppet is ready, refer to it by the character’s name from the textbook. This helps children connect with the content and improves recall.
- The teacher should use the puppet at an appropriate time, perhaps while narrating the story in a funny and humorous way. Intentional mistakes can also be made to encourage children to correct them, making the session more interactive and engaging.
Precautions
Precautions to be taken while manipulating finger puppets:
- Always keep the puppet’s face directed towards the audience.
- The Puppet Master’s focus should remain on the puppet at all times.
- Only the puppet that is “speaking” should be animated; all other puppets should remain still.
Troubleshooting:
- While making the paper pipe, ensure it matches the exact size of the finger you will be using. This helps to move the puppet properly.
- Use a cutter carefully to make clean, precise holes.
- The holes should match the size of your fingers. If the hole is too large, the puppet won’t stay upright on your finger. If the hole is too small, it will be difficult to insert your finger.
 Notes to the Teacher
Puppets can be effectively used in the classroom to help children understand and express emotions. They are also valuable tools for teaching rhymes, songs, stories and more.
In addition to enriching learning experiences, using puppets supports the development of motor skills such as hand – eye coordination. They also enhance communication and social skills, improve focus and concentration, and help reinforce concepts and values in an engaging way.
Using the Learning Teaching Material
The teacher can demonstrate a puppet show as an example. Students can then be encouraged to create their own puppets and present a puppet show in the classroom.
Video: How to use Learning Teaching Material
| Source and Attribution of images All images used in the above Assets and Aids are originally created. |
| This digital material has been developed by the Sri Sathya Sai Vidya Vahini Inclusive Education Project, a unit of Sri Sathya Sai Central Trust, Prasanthi Nilayam, as a collaborative offering in the service of our nation. |