Puppet – Two Finger
Bird

TWO FINGER PUPPET_ BIRD
PUPPET
 Objective
Teachers will be able to create two finger puppet bird for story-telling and other purposes.
Estimated time to create the LTM
30 to 45 Minutes
Materials required for activity
- 2” X 3” size Drawing Sheet/Color Paper
- 6” X 6” size Drawing Sheet/Color Paper
- 2” X 5 “ size – 2 Paper Pipes
- Sketch Pens
- Marker Pen
- Pencil
- Eraser
- Scale
Preparation of Activity
Please ensure all the materials are ready for the activity.
Procedure
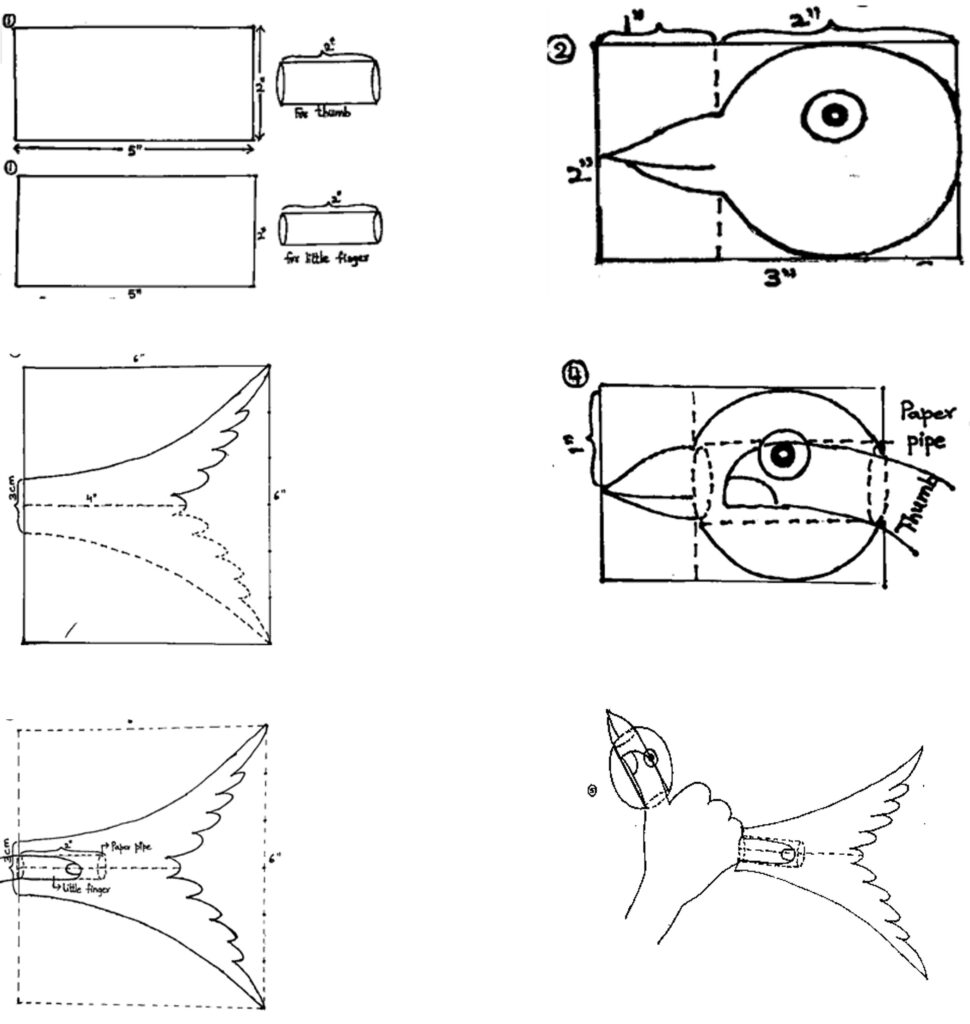
- Make two paper pipes (2” X 5 “ size strip) for the thumb and little finger.
- Take 2” X 3” drawing sheet/color paper and draw a head on it.
- Take a 6” X 6” drawing sheet/ color paper and draw a tail on it.
- Attach the head part to the thumb pipe and tail to the little finger pipe.
- Put the paper pipes to your thumb and to the little finger and fold the remaining fingers.
- If you move your thumb, the head will move. If you move your little finger, the tail will move.
Note:
Please draw all pictures using pencil. After you are satisfied with the result, you can draw it over with a black marker pen or sketch pen.
Step by Step Pictures to create the puppets

Important Tips
- We can use A4 colour papers exactly suitable for the puppet instead of using crayons or watercolours.
- We can use ‘googly eyes’ (plastic eyes, which are available in the market) instead of drawing.
- We can attach ‘creeper’ ( artificial hair which we wear in drama make-up) instead of drawing it with black marker.
- We can use wedding cards / book covers instead of drawing sheets.
- We should use thick markers for outline and fine tip markers for drawing thin lines.
- If we use crepe paper for the dress of the puppet, the texture will bring the appearance of cloth.
- To get an idea of drawing any picture, we can take the pictures from drawing books or the internet.
- While making a puppet, draw the picture given in the children’s textbook. After making the puppet, call the puppet with the name given in the textbook. Using the name in the textbook helps children to remember the content.
- The teacher has to use the puppet at an appropriate time. The teacher can narrate the story in a humorous way. The teacher can commit some mistakes purposefully to make the child identify.
Precautions
Precautions to be taken while manipulating finger puppets:
- Always keep the face of the puppet towards the audience.
- Focus of the Puppet Master should be on the puppet.
- Puppets that are talking are only activated. Other puppets should remain in a still position.
Troubleshooting:
- While making a paper pipe, take the exact size of your finger which you are using. It aids in the proper movement of the puppet.
- Use a cutter to make holes.
- Holes that you are making should be exactly in the size of your fingers. If the hole is big, the puppet cannot stand on your fingers. If the hole is small you cannot insert your fingers.
 Notes to the Teacher
Puppets can be used in the classroom to teach emotions to the child. Puppets are a good tool to teach rhymes, songs, stories etc. They also help in motor coordination, hand-eye coordination while the child uses the puppet. Communication and social skills can be improved. Focus and concentration will improve . Concepts and values can be taught.
Using the LTM
The teacher can demonstrate a ‘Puppet Show’. Teachers can encourage the students to create these puppets and have a ‘Puppet Show’ in the classroom.
Video: How to use LTM
| Source and Attribution of images All images used in the above Assets and Aids are originally created. |
| This digital material has been developed by the Sri Sathya Sai Vidya Vahini Inclusive Education Project, a unit of Sri Sathya Sai Central Trust, Prasanthi Nilayam, as a collaborative offering in the service of our nation. |