Monkey
 Objective
To guide teachers to create a Monkey Puppet that can be used in classrooms for storytelling, rhymes and activity-based learning.
Estimated time to create the Monkey Puppet
20 to 30 Minutes
Materials required for creating the Monkey Puppet
- White chart paper or thick A4 sheet
- Coloured chart papers (brown, yellow, red and pink)
- Black sketch pen
- Pencil and eraser
- Glue drops or Fevicol
- Scissors
- Two thin wooden or plastic rods/straws
- Googly eyes (optional)
- Black wool (optional, for tail or detailing)
Preparation for Activity
- Keep all materials arranged neatly on the workspace.
- Pre-cut the coloured paper into small pieces for ease of assembly.
- Ensure rods or straws are of equal length for balanced puppet control.
- Use child-safe scissors if children are participating.
Procedure
Hello everyone! Welcome to this puppet-making session. Today, we’ll make a fun and lively Monkey Puppet that you can use for classroom storytelling and songs like, ‘Five Little Monkeys’ or ‘Monkey and the Crocodile’.
- Step 1:
- On a white chart paper, draw the outline of a monkey-face, body, arms and legs. You can use brown chart paper for the body and yellow or pink for the face and inner ears.
- Step 2:
- Carefully cut out each part of the monkey. Use a pencil to label the parts if you’re preparing for a classroom demonstration.
- Step 3:
- Paste the facial features neatly – paste googly eyes or draw the eyes, nose and a smiling mouth using a sketch pen. Add a tail cut-out to the back of the puppet.
- Step 4:
- Attach the two supporting rods: one behind the head and one behind the lower body. These will help move the puppet during performance. Allow the glue to dry well before moving the puppet.
- Step 5:
- Hold the rods and make the puppet jump or dance. Try moving the head slightly while lifting the body up and down to show playful monkey movements.
- Now your Monkey Puppet is ready! You can use it in rhymes, stories or role plays.
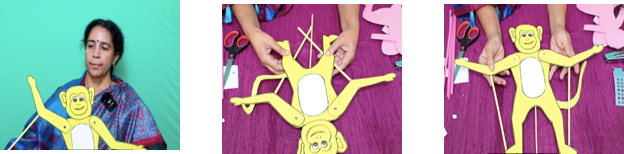
Step by Step Pictures to create the puppet
Important Tips
- Use thick chart sheets to make the puppet sturdy.
- If coloured paper is unavailable, colour the white paper using crayons or sketch pens.
- Keep the design simple and expressive to hold students’ attention.
- Practice moving the puppet before the classroom session for a smooth session.
Precautions
- Use glue sparingly to prevent wrinkling.
- Ensure rods are securely fixed and not sharp.
- Keep the puppet’s face towards the audience during use.
- Always supervise children handling scissors or sticks.
Troubleshooting:
- Problem: Puppet tilts or doesn’t move properly.
- Solution: Adjust rod placement and ensure glue has dried completely.
- Problem: Paper bends or becomes soft.
- Solution: Use thicker chart paper or laminate lightly with transparent plastic sheet.
- Problem: Features peel off.
- Solution: Use Fevicol on edges and press for a few seconds until firm.
 Notes to the Teacher
Puppet-making builds fine motor skills and creativity in children. The Monkey Puppet can represent characters in fables, moral stories, or English rhymes. It encourages expressive speech and confidence. Teachers can personalize the puppet with names, costumes or accessories to fit thematic learning sessions.
Different ways of using the Puppet in class:
- Storytelling: Use for tales like The Monkey and the Crocodile or The Clever Monkey.
- Language Development: Practice dialogues, verbs (jump, climb, laugh).
- Value Education: Show messages like: ‘Think before you act’ or ‘Be kind’.
- Math: Counting activities like: ‘Five Little Monkeys’.
- EVS: Habitats, jungle animals and body parts of animals.
Encourage students to make their own puppets and perform short skits in groups.
Using the Learning Teaching Material
The teacher can present a simple ‘Puppet Show’ as a demonstration. Students can be encouraged to create their own puppets and participate in a classroom ‘Puppet Show’.
Video: How to use Learning Teaching Material
| Source and Attribution of images All images used in the above Assets and Aids are originally created. |
| This digital material has been developed by the Sri Sathya Sai Vidya Vahini Inclusive Education Project, a unit of Sri Sathya Sai Central Trust, Prasanthi Nilayam, as a collaborative offering in the service of our nation. |