Weigh Balance
 Objective
To help teachers explain the concept of measurement and comparison.
Estimated time to create the weigh balance
30 to 45 minutes
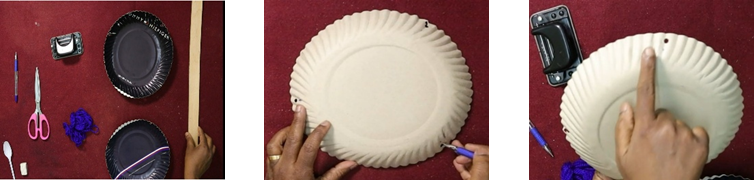
Materials required for creating the weigh balance
- Paper plates – 2 nos.
- String/ thick thread
- Black marker / Pen
- Punching Machine
- Wooden scale / Stick
- Scissors
Preparation for activity
Ensure all materials are ready for assembling the weighing balance.
Procedure
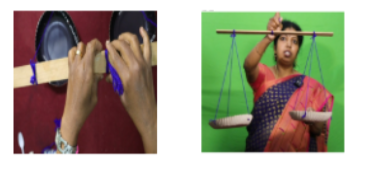
- Take a paper plate and use the pen to mark three points on its surface, as shown.
- Using the punching machine, punch holes at the marked points.
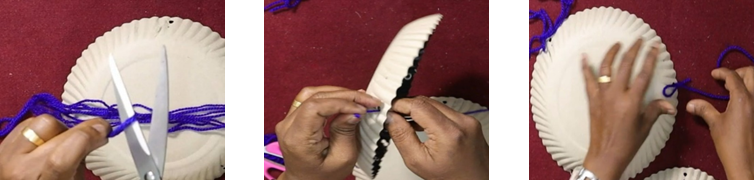
- Cut six equal lengths of string or thick thread.
- Insert one end of a string into one of the punched holes and tie it firmly.
- Similarly, tie the ends of two more strings through the remaining holes in the plate.
- Gather the free ends of these three strings and knot them together.
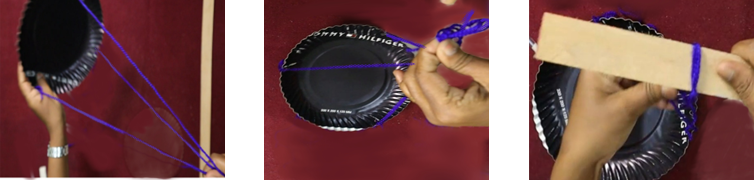
- Take the wooden stick and secure the knotted string near one end.
- Repeat the process for the second paper plate and tie it to the other end of the wooden scale or stick.
- Ensure that both plates are tied at equal distances from the ends of the stick.
- Tie a thick thread to the middle of the stick to serve as the handle for lifting the balance.
- The weighing balance is now ready.
Demonstration:
- Hold the thread tied at the centre of the stick and lift the balance.
- Ensure both plates hang at the same level.
- Place small objects of different weights, such as an eraser or plastic spoons on each plate and observe their movement.
- Point out the difference in plate levels to explain the concept of heavier and lighter objects.
Step by Step Pictures to create the weigh balance
Important Tips
- Use thick paper plates for durability.
- Choose a longer stick or scale to ensure the plates hang freely without getting entangled.
- Mark three equidistant points on each plate, as shown in the picture, to keep them level while weighing.
- Avoid punching holes too close to the edge of the paper plate to prevent tearing.
Precautions
- Ensure the paper plates are securely attached and properly aligned.
- Test the balance beforehand to confirm it functions correctly.
- Avoid placing excessively heavy objects on one side as this may tip over or damage the balance. Use lightweight items like beads, paper clips or small blocks for demonstration.
- Always supervise children while they use the balance.
- Encourage careful handling and explain the importance of using suitable objects.
- Use small objects only under close supervision to prevent any safety hazards.
- Smooth out any sharp edges on materials like scissors or rods before allowing children to use them. Opt for rounded or blunt-edged tools when possible.
- Regularly inspect the balance to ensure all parts remain securely attached and functional. If necessary, reinforce parts with additional tape or glue.
Troubleshooting:
Here are some common issues and solutions to ensure the balance works smoothly:
- The balance doesn’t stay level or one side consistently tips over:
- Ensure the paper plates are securely attached and evenly positioned on both sides.
- The paper plates are bent or uneven:
- Replace them with fresh ones or ensure they are lying flat.
- The scale is unstable and falls over when objects are placed on it:
- Use a thicker cardboard base to provide better support.
- Ensure the support stick is strong enough to handle the weight of the plates and objects.
- If using string, check that it is securely attached and not too loose, as excessive movement can cause the balance to sway.
- Objects slide off the plates too easily:
- Add a piece of tape or a non-slip material (such as fabric or rubber bands) to the bottom of the plates to increase friction.
- The balance doesn’t clearly show weight differences:
- Use only a few objects on each side to make comparisons more noticeable.
- This helps children focus on the concept of heavier vs. lighter objects.
- Children are distracted or confused by the concept:
- Simplify the demonstration by focusing on basic principles:
- “Which side is heavier?”
- “What happens when we add more weight?”
- Use colourful or engaging objects (such as toys or fun shapes) to maintain their interest.
- Ask simple questions like, “What do you think will happen if we add this block here?” to encourage interaction and curiosity.
- Break the concept into small steps and allow children to experiment with placing objects on the scale.
 Notes to the Teacher
- Teaching the concept of weighing helps children observe how the balance shifts when different weights are placed on either side, developing their analytical and critical thinking skills.
- It introduces the idea of measurement and comparison.
- By using objects of known or similar weights, children can learn to compare items based on their heaviness or lightness.
- When children try to balance the scale, they may face situations where the objects are not balanced, prompting them to think about how to adjust it—this encourages problem-solving and reasoning.
- Handling small objects and placing them on the balance scale helps develop fine motor skills and hand-eye coordination.
Using the Learning Teaching Material
- The teacher can demonstrate the weighing balance using small objects.
- Show the step-by-step process of making the balance using simple materials, allowing children to see how it works. This provides a clear example for them to follow.
- Involve the children in the planning process.
- Engage the class in a brainstorming session by asking for suggestions about materials they think might work (e.g., paper plates, sticks, string).
Video: How to use Learning Teaching Material
| Source and Attribution of images All images used in the above Assets and Aids are originally created. |
| This content is jointly developed by Sri Sathya Sai Vidya Vahini Inclusive Education Project, a unit of Sri Sathya Sai Central Trust, Prashanthi Nilayam, and All India Institute of Speech and Hearing (AIISH) as an offering in the service of our nation, for the benefit of CWSN. |